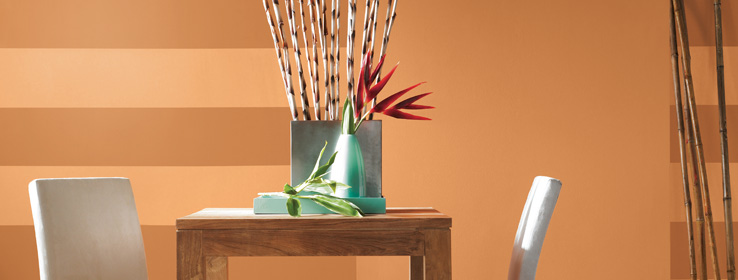
Learn how to give a blank wall some personality with stripes. Stripes are a great decorative painting technique for your walls. Horizontal stripes make a room appear more spacious; vertical stripes make the ceiling appear higher. Read the steps below on how to apply paint stripes to your wall.
Watch the Video on How to Paint Stripes
Supplies Needed:
Two different paint colors – Basecoat and coordinating color for stripe pattern
NOTE: You may want to paint more than one color stripe OR tone-on-tone (the same color for two stripes utilizing different sheens) so plan accordingly when purchasing paint.1" or 2" low-tack/safe-release tape
9" roller frame and cover
Mini roller frame and cover
Roller pan with liner
Pencil, colored pencil or chalk to mark lines
Tape measure, carpenters level, straight edge
Step 1:
Choose vertical or horizontal stripes. Horizontal stripes make a room appear more spacious; vertical stripes make the ceiling appear higher. Striping is a very simple technique. And the final effect can add to the perceived size and dimension of a room. Just remember to measure and tape carefully.
Step 2:
When you have all your supplies ready, and the room cleared for painting, paint your base coat of paint on the wall using the lighter of the two colors you have decided to use first. Let it dry at least 4 hours or overnight for best results.
Step 3:
After the base coat is completely dry, begin measuring and marking the walls for the stripes. Measure the wall, starting in the corner that's least seen. Next, divide the wall. Stripes should be between 4" and 12" wide.
Tip: A width of less than 4" would be too narrow and busy; more than 12", too wide and heavy. Place the first strip of tape or mark in that obscure corner where you began measuring.
Step 4:
Using a tape measure, plot/mark the wall with lines corresponding to the width of the stripes you wish to paint, this will keep you from having to measure each stripe as you tape the wall.
If your stripes are going to be the same width measure the wall and divide by that number or measure the wall and divide by an odd number to reach a desired stripe width.
Tip: An odd number of stripes will insure the stripes at the corners are the same color. This makes the design more cohesive. If you plan to paint all the walls with stripes you will need to adjust accordingly.
Step 5:
Next, use a level or straight edge to create the outline for your stripes. Use low-tack /safe-release tape.
Tip: Remember that because you will be painting only every other stripe, you'll need to tape out the pattern so that every other stripe is outlined by the tape. Make sure to tape outside the chalk line; fresh paint will cover up the lines.
Tip: If making the lines with a chalk line, use blue chalk because red or yellow is a permanent color.
Tip: If the measurements don't work out perfectly, any small differences likely won't be seen because you started in an obscure corner. If you want to be more exact, adjust the width of the stripes on the last wall. A 1/4" to 1/2" difference won't be visible to the eye.
Video Transcription:
You don't need a canvas to create original artwork.
Make a unique statement with stripes.
Fill a room with stripes and many colors.
Make them wide or narrow, horizontal or vertical, Horizontal stripes make a room appear more spacious.
Vertical stripes make the ceiling appear higher.
No matter what pattern you choose, stripes are an easy and creative way to enhance any room.
In this video, we'll show you how to paint horizontal stripes.
Step 1: Preparation.
Think about the design you'd like to create.
Do you want the stripes to be wide or narrow?
You may want to paint more than one color stripe or tone-on-tone, which is the same color using different Sheens.
You'll also need to know the dimensions of your wall.
If you want the stripes to have the same width, measure the wall from the ceiling to the floor and divide by an odd number to determine the stripe width.
An odd number of stripes ensures the stripes at the top and bottom of the wall are the same color.
For example, if your wall is 96 inches and you want wide stripes, divide by a smaller odd number, like nine.
For a more narrow stripe divide by a larger odd number, like 15.
Keep in mind stripes look best if they are between 4 and 12 inches wide.
Once you've determined your design, gather the right tools for your project at your neighborhood Sherwin-Williams store.
Choose your paint colors.
One color is the base coat and the others are coordinating colors, which create the stripe pattern.
Make sure you have the following supplies:
1 or 2-inch low-tax safe-release tape, a 9-inch roller frame and cover, mini roller frame and cover, roller pan with liner, tape measure, carpenters level, straight edge and a pencil.
Step 2: Paint the base coat.
You can use your existing wall color as the base coat or apply a new color.
If you apply a new color, let it dry for at least four hours or overnight for best results.
Step 3: Mark and tape the stripes.
Measure and mark the lines for each stripe on the wall.
Use a level or straightedge to create the lines for your stripes.
If you're using a chalk line, use blue chalk because red and yellow are permanent.
Apply tape to every other stripe and place it just outside the line so you cover it with paint.
The last step is to paint the stripes.
For good coverage, apply the paint over the tape line.
Paint every other stripe.
Let it dry for at least four hours.
Then remove the tape by angling it away from the painted stripes.
Creating original art on your walls is easy with Sherwin-Williams.
Whether you go wide, narrow or vary the size stripes enhance the look of any room.
For more information about other decorative techniques or Sherwin-Williams, visit sherwin-williams.com.


